JEE / J2EE has been around for a long time, and has maintained a reputation as a platform that is both slow, heavyweight, and difficult to use. But things have changed dramatically for the better since those dark days.
JEE used to be something to consider only if you were building a big corporate intranet with powerful servers and absolutely needed its proven scalability. In fact, to this day, many would find the idea of using JEE for anything less than Enterprise class problem to be the very defintion of ‘overkill’.
However, since around the time JEE 5 was released–and particulalry JEE 6–JEE has become a platform that is–dare I say it–a pleasure to code on! JEE 6+ has allowed developers to replace the endless boilerplate code, the “XML Hell”, and the layers upon layers of interfaces (that had become synonymous with J2EE), with the use of simple annotations. At the same time, the new slimmed-down JEE specification has allowed server implementors the ability to dramatically reduce the internal overhead and memory footprints of their servers. All in all, this has made coding, configuring, and running a JEE application an order of magnitude simpler than its predecessors.
Anti-Flame
The point of this post is not to convince anyone that JEE is better or easier than any other platform. The point of it is to simply demonstrate how simple it can be to code for nowadays. The coders I’m targeting with this blog are (a) those who are evaluating application servers to develop their project and that may have dismissed JEE outright due to its reputation, and (b) former J2EE coders who abandoned the platform because of its former complexities. I should also add that I don’t wish to imply that all of the new simplifying features of JEE came into existence with JEE! JEE owes a lot to platforms like Spring for much (but not all) of its newfound simplicity.
The Project
To help illustrate how simple it can be to code for JEE 6+, we’re going to be building a simple REST server that supports a basic chat app. But, we will also add some interesting additional features that highlight some of the benefits of JEE 6.
A user should be able to:
- create public or private chat “channels”,
- join a private chat channel,
- post a comment to a public channel,
- post a comment to a private channel if they are a member of the channel.
The Tools
For our JEE 6 server, we’re going to be using Apache TomEE+. What makes TomEE especially cool is that it was designed from the ground up to run on Tomcat. In fact, the TomEE developers have gone so far as to create a TomEE drop-in WAR that can turn a run-of-the-mill Tomcat server into a full-blown JEE 6 server by simply deploying the TomEE+ WAR. This is especially good news for developers that want to use JEE 6 on a shared host for testing.
For persistence, we will be using JPA 2.0–the Java Persistence Architecture–as our ORM (object relational mapping) API. On TomEE, the default JPA provider is Apache OpenJPA, though its possible to swap in other JPA 2.0 providers such as Hibernate (though I have not tried this myself). Our underlying database will be MySQL, however–again–this can also be swapped out for a database from another vendor.
Our project will support network data exchange over HTTP in either JSON or XML. TomEE+ comes with Jersey by default for handling data conversion between native Java objects and JSON/XML, however, we will be swapping out Jersey and replacing it with Jackson.
For a full, detailed setup guide, read my previous post in this series: Setting up a TomEE project with eclipse.
The database schema
To support the functions that we want for our app, we have designed the following schema :
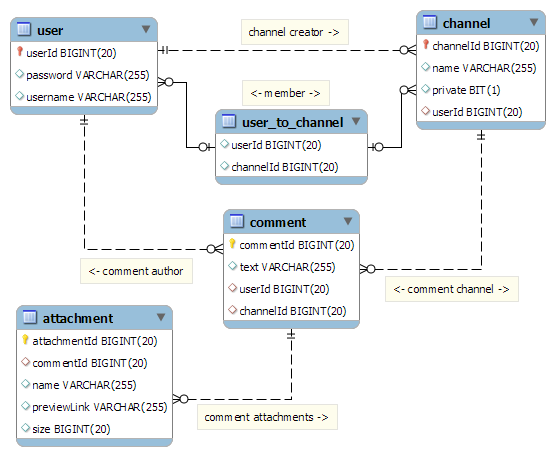
The tables we created are user, channel, comment, and attachment.
JPA 2.0
Instead of using straight SQL queries and JDBC ResultSets, we have opted to use JEE 6’s JPA 2.0 framework. JPA stands for “Java Persistence Architecture”. One of the main things that makes JPA cool, is that it handles the conversion of query results into native Java objects. The other important thing it allow us to do is traverse relationships between tables simply by traversing relationships between objects. To make this clear, below is a small example. Don’t worry about the nitty gritty details of this example such as this mysterious em–object all of it will become clear through the course of this tutorial. This is just to give you a flavour of the kinds of things we can do with JPA.
Example 1: Get and display the comments in a channel
    public String displayChannelComments(Long channelId)
    {
        // get the channel from the database using its primary key
        Channel channel = em.find(Channel.class, channelId);

        // get the all the comments in the channel
        List<Comment> channelComments = channel.getComments();

        // print each comment and its author
        String s = "";

        for(Comment c : channelComments)
        {
            User author = c.getAuthor();
            s += "author: " + author.getUsername() + "n";
            s += c.getText() + "nn";
        }

        return s;
    }
How easy was that? Let’s try another example.
Example 2 : Post a comment in a channel
    public Comment postComment(Long authorId, Long channelId, String text)
    {
        // get the channel
        Channel channel = em.find(Channel.class, channelId);

        // get the author
        User author = em.find(User.class, authorId);

        // if the channel is private, ensure the author is a member
        if(channel.isPrivate() && !channel.getMembers().contains(author))
            return null;

        // create an empty comment
        Comment comment = new Comment();

        // "persist" puts the object under JPA management
        em.persist(comment);

        // set the text
        comment.setText(text);

        // set the author
        comment.setAuthor(author);

        // update the channel AND the comment
        // we'll see why we need to update "in both directions" later
        comment.setChannel(channel);
        channel.getComments().add(comment);

        return comment;
    }
Now, imagine writing the code above with JDBC queries… it would not have been nearly as easy, or concise, or as clear. Even without knowing JPA, it is pretty straight-forward to figure what the code above is doing.
So the real question is, how do we configure things so we can get functionality like we have above? This is what we will delve into next.
JPA Entities
Based on our database, we are going to create some objects that mirror its structure: specifically, we are going to create one entity object for each table in our database, except for the join table. Its also important to note that JPA does not require that we start with a database–it can automatically construct a schema from our entity objects.
The names and datatypes of the fields in our entity classes will become the column names and column datatypes in the database. These variables must be private and must have standard JavaBean getter and setter accessors.
Note that not all variable types are mirrored in the database. You can read about what different types of fields are mirrored in the database in the Persistent Fields and Properties in Entity Classes section of the Oracle JPA docs.
RECOMMENDATION
I strongly suggest that you allow your database to use standard Java camelCase names in your columns. Although traditionally, databases use names like (for example) EMP_ID for the primary key column of an employee table, I’d suggest using something more ‘Java-ish’ like employeeId, and I’d recommend using that same name in your entity classes. Doing this will simplify your experience with JPA considerably.
Unfortunately, you may be in a situation where you have a pre-existing database schema that you need to integrate with. Luckily, you don’t have to create an entity with variables names Long EMP_ID and getters like getEMP_ID(). You can use the @Column annotation on your getters to remedy the mismatch. For example
private Long employeeId;

...

@Id @GeneratedValue(strategy = GenerationType.IDENTITY)
@Column(name="EMP_ID")
public Long getEmployeId()
{
    return employeeId;
}
However, I’ll stress again that if you can avoid having to do this, you will be much happier for it.
OK! With that said, let’s create our entities!
User entity
package chatserver.model;

import javax.persistence.Entity;
import javax.persistence.GeneratedValue;
import javax.persistence.GenerationType;
import javax.persistence.Id;
import javax.persistence.Table;

@Entity @Table(name = "user")
public class User
{
    private Long userId;
    private String username;
    private String password;

    @Id @GeneratedValue(strategy = GenerationType.IDENTITY)
    public Long getUserId() {
        return userId;
    }
    public void setUserId(Long userId) {
        this.userId = userId;
    }

    public String getUsername() {
        return username;
    }
    public void setUsername(String username) {
        this.username = username;
    }

    public String getPassword() {
        return password;
    }
    public void setPassword(String password) {
        this.password = password;
    }
}
Overall, what we have so far is just a simple JavaBean with some annotations.
@Entity @Table(name = "user")
public class User
@Entity : This tells the server that this class is a JPA entity. This means that it can be “managed” by the JPA subsystem.
@Table(name = “user”) : This tells JPA that we want this entity to be associated a table in our database named user.
    private Long userId;
    private String username;
    private String password;
These represent the columns of the user table. userId will be the primary key ; username and password will be text columns. Underneath these three private variables, we have a set of getters and setters for them. These can be automatically generated by eclipse by right-clicking in the User class and then selecting Source > Generate Getters and Setters.
The last annotation appears above the getUserId() getter :
    @Id @GeneratedValue(strategy = GenerationType.IDENTITY)
    public Long getUserId() {
        return userId;
    }
@Id : This tells JPA that userId is the primary key for this table.
@GeneratedValue(strategy = GenerationType.IDENTITY) : This tells JPA that we want the primary key to be automatically generated (auto-incremented).
We will now create entity classes for the channel, comment, and attachment tables in a similar fashion.
Channel entity
package chatserver.model;

import javax.persistence.Entity;
import javax.persistence.GeneratedValue;
import javax.persistence.GenerationType;
import javax.persistence.Id;
import javax.persistence.Table;

@Entity @Table(name = "channel")
public class Channel
{
    private Long channelId;
    private String name;
    private boolean isPrivate;
    private Long userId;


    @Id @GeneratedValue(strategy = GenerationType.IDENTITY)
    public Long getChannelId() {
        return channelId;
    }
    public void setChannelId(Long channelId) {
        this.channelId = channelId;
    }

    public String getName() {
        return name;
    }
    public void setName(String name) {
        this.name = name;
    }

    public boolean isPrivate() {
        return isPrivate;
    }
    public void setPrivate(boolean isPrivate) {
        this.isPrivate = isPrivate;
    }

    public Long getUserId() {
        return userId;
    }
    public void setUserId(Long userId) {
        this.userId = userId;
    }
}
Comment entity
package chatserver.model;

import javax.persistence.Entity;
import javax.persistence.GeneratedValue;
import javax.persistence.GenerationType;
import javax.persistence.Id;
import javax.persistence.Table;


@Entity @Table(name = "comment")
public class Comment
{
    private Long commentId;
    private Long channelId;
    private String text;
    private Long userId;


    @Id @GeneratedValue(strategy = GenerationType.IDENTITY)
    public Long getCommentId() {
        return commentId;
    }
    public void setCommentId(Long commentId) {
        this.commentId = commentId;
    }

    public Long getChannelId() {
        return channelId;
    }
    public void setChannelId(Long channelId) {
        this.channelId = channelId;
    }

    public String getText() {
        return text;
    }
    public void setText(String text) {
        this.text = text;
    }

    public Long getUserId() {
        return userId;
    }
    public void setUserId(Long userId) {
        this.userId = userId;
    }
}
Attachment entity
package chatserver.model;

import javax.persistence.Entity;
import javax.persistence.GeneratedValue;
import javax.persistence.GenerationType;
import javax.persistence.Id;
import javax.persistence.Table;


@Entity @Table(name = "attachment")
public class Attachment
{
    private Long attachmentId;
    private Long commentId;
    private String name;
    private Long size;
    private String previewLink;

    @Id @GeneratedValue(strategy = GenerationType.IDENTITY)
    public Long getAttachmentId() {
        return attachmentId;
    }
    public void setAttachmentId(Long attachmentId) {
        this.attachmentId = attachmentId;
    }

    public Long getCommentId() {
        return commentId;
    }
    public void setCommentId(Long commentId) {
        this.commentId = commentId;
    }

    public String getName() {
        return name;
    }
    public void setName(String name) {
        this.name = name;
    }

    public Long getSize() {
        return size;
    }
    public void setSize(Long size) {
        this.size = size;
    }

    public String getPreviewLink() {
        return previewLink;
    }
    public void setPreviewLink(String previewLink) {
        this.previewLink = previewLink;
    }
}
Persistence units and persistence.xml
In order to make TomEE’s JPA subsystem aware aware of our entity classes, we need to add a configuration file called persistence.xml to our project. TomEE expects to find this configuration file in the WebContent/META-INF folder of your eclipse project.
In addition to identifying our project’s entity classes, persistence.xml tells JPA which database we wish to store and retrieve these entities from. The association of a set of entity classes with a datasource is called a persistence unit. Note that I said that the association of a set of entity classes with a datasource is called a persistence unit—NOT the association of a set of entity objects with a datasource is called a persistence unit. This is an important detail to remember when trying to understand the role of persistence units in JPA. We will much have more to say on persistence units later on.
Below I have provided a basic persistence.xml for the project.
<?xml version="1.0" encoding="UTF-8" ?>
<persistence xmlns:xsi="http://www.w3.org/2001/XMLSchema-instance"
  xsi:schemaLocation="http://java.sun.com/xml/ns/persistence http://java.sun.com/xml/ns/persistence/persistence_2_0.xsd"
  version="2.0" xmlns="http://java.sun.com/xml/ns/persistence">

    <persistence-unit name="chatserver_jpa_tx" transaction-type="JTA">

        <provider>org.apache.openjpa.persistence.PersistenceProviderImpl</provider>
        <jta-data-source>datasource_chatserver</jta-data-source>

        <!-- Entities -->
        <class>chatserver.model.User</class>
        <class>chatserver.model.Channel</class>
        <class>chatserver.model.Attachment</class>
        <class>chatserver.model.Comment</class>

        <!-- JPA2 and OpenJPA-specific properties here -->
        <properties>
            <!--
                          Controls whether OpenJPA will attempt to run the mapping tool on
                 all persistent classes to synchronize their mappings and schema
                 at runtime. Useful for rapid test/debug cycles
            -->
            <property name="openjpa.jdbc.SynchronizeMappings" value="buildSchema"/>
        </properties>

    </persistence-unit>
</persistence>
Below I’ll walk through a few of the important aspects of this file.
<persistence-unit name="chatserver_jpa_tx" transaction-type="JTA">
This defines the name of our persistence unit (name = chatserver_jpa_tx) for our ChatServer application. It also says that we want TomEE to automatically manage all of our database transactions (transaction-type="JTA"). Letting our JEE container manage our transactions make life a whole lot easier for us and reduces the amount of boiler-plate code we need to write.
<provider>org.apache.openjpa.persistence.PersistenceProviderImpl</provider>
<jta-data-source>datasource_chatserver</jta-data-source>
The first line above tells TomEE that we wish to use OpenJPA as our JPA provider. OpenJPA works well and comes built-in to TomEE, however, its possible to use different JPA 2.0 providers such as Hibernate. Just note that TomEE is only compatible with JPA 2.0, so using a JPA 2.1 provider will likely cause errors.
The second line above connects our persistence unit (chatserver_jpa_tx) to a specific datasource–datasource_chatserver. datasource_chatserver is defined in <Tomcat-Install>/conf/tomee.xml. You can find the details on how datasource_chatserver was configured in the Adding the database section of part 1 of this tutorial.
<property name="openjpa.jdbc.SynchronizeMappings" value="buildSchema"/>
This is an OpenJPA-specific property. It tells OpenJPA to re-read our entity objects every time the server starts, and to update the database schema if there have been changes made to our entity classes. This is great for rapid development, however it is recommended that this be removed on production servers.
Next time
In the next part of this series, we will explore how to annotate our entity classes so that they support our database relationships (e.g.: Many-to-Many, One-to-Many, and Many-to-One).
Now that we have everything set up, we will go on to define the relationships between these entity classes.