The guide below is the configuration tutorial for a short series of posts in which I take you through the process of creating a simple chat server using JEE 6 via the TomEE application server. The aim is to show just how much simpler JEE has become since its older, more heavyweight J2EE days.
The approach I use requires basic, and likely familiar open source software like Tomcat and MySQL. In fact, the TomEE application server is simply a .war file deployed on Tomcat (a so-called “drop-in” .war)! If this piques your interest, then be sure to stay tuned for the full tutorial.
Prerequisites
This guide assumes you have Tomcat version 7.0.61 (TomEE 1.7.2 requires this specific version of Tomcat) and a working version of the TomEE+ 1.7.2 drop-in war running on your Tomcat server (if you don’t, you can install it by following this simple and quick guide: Installing TomEE using the drop-in .war approach). We also assume you have an available connection to an empty database–however, I will explain how to configure it with TomEE. Lastly, we assume you have some familiarity with Tomcat and Eclipse.
NOTE: You don’t have to use the drop-in war approach, but I like it as it works for people who may be running Tomcat on a shared host, or who want to add TomEE to an existing Tomcat installation. In fact, according to the folks over at the TomEE project “The only real difference between a “Tomcat with drop-in tomee.war” and a “TomEE” install is where the additional libraries live” (see About the ‘tomee’ webapp).
GOTCHA #1: When installing TomEE with the drop-in .war, make sure that you rename tomee-plus-webapp-1.7.2.war to tomee.war after placing it in your Tomcat webapps folder, or you will get errors.
GOTCHA #2: Make sure that Eclipse is running under a JDK and not a JRE. Although Eclipse can run with a standard JRE, TomEE cannot. You can ensure that Eclipse is using a JDK of your choosing by editing eclipse.ini in <eclipse-Install>/eclipse.ini (or possibly <eclipse-Install>/eclipse/eclipse.ini, if you manually unzipped it). Below is an example of an edited eclipse.ini ; the relevant portion is highlighted in blue. You can read more about configuring eclipse with eclipse.ini here : eclipse.ini.
-startup
plugins/org.eclipse.equinox.launcher_1.3.100.v20150511-1540.jar
--launcher.library
plugins/org.eclipse.equinox.launcher.win32.win32.x86_64_1.1.300.v20150602-1417
-product
org.eclipse.epp.package.jee.product
--launcher.defaultAction
openFile
--launcher.XXMaxPermSize
256M
-showsplash
org.eclipse.platform
--launcher.XXMaxPermSize
256m
--launcher.defaultAction
openFile
-vm
C:PROGRA~1Javajdk1.8.0_60binjavaw.exe
--launcher.appendVmargs
-vmargs
-Dosgi.requiredJavaVersion=1.7
-Xms256m
-Xmx1024m
Jackson and MySQL libraries
The default JSON object mapper that is included with TomEE does not produce correct JSON output, and would likely cause any clients applications you create to complain about your server producing ‘Malformed JSON’. So for this tutorial, we will be using Jackson by FasterXML for mapping between JSON data and Java objects.
As for our persistent storage, we will be using MySQL as our database for the tutorial so we’ll need to include the MySQL JDBC driver jar as well.
Jackson Jars
FasterXML’s has extremely confusing and ambiguous documentation regarding what jars you might need and where to download all of them. To save you from pulling your hair out and screaming in frustration, I have provided direct links to the Maven repo for each of the jars we will need. (Note: Yes–It would be great to be able to use Maven when building our project, but there are some issues around integrating Maven into an Eclipse “Dynamic Web” project–and we require a Dynamic Web project for this tutorial ; this is why I’m providing the direct jar links so we don’t have to deal with these complications).
I am using version 2.4.3 of the Jackson jars (direct links below), however, you can download any 2.x.y version you wish as long they all have the same major and minor version (where 2 is the major version, and x is the minor version). For example, you can mix a 2.4.7 jar with a 2.4.3 jar (since the major and minor versions are both 2.4), and you can mix a 2.6.1 jar with a 2.6.7 jar, but you can’t mix a 2.4.7 jar with a 2.6.7 jar.
For now, I would suggest just downloading the same 2.4.3 jars that I am using. You can always update your jars later.
Jackson 2.4.3 jars
Jackson 2.4.3 Core jar
Jackson 2.4.3 Databind jar
Jackson 2.4.3 Annotations jar
Jackson 2.4.3 JAXB Annotations jar
Jackson 2.4.3 JAX-RS Base jar
Jackson 2.4.3 JAX-RS JSON Provider jar
Jackson 2.x REPO links
If you feel that you simply MUST be using the latest jars, then I have also provided links to Maven folders that contain all 2.x versions of each jar.
Jackson Core jars (all 2.x versions)
Jackson Databind jars (all 2.x versions)
Jackson Annotations jars (all 2.x versions)
Jackson JAXB Annotations jars (all 2.x versions)
Jackson JAX-RS Base jars (all 2.x versions)
Jackson JAX-RS JSON Provider jars (all 2.x versions)
MySQL JDBC driver jar
You can download this at Download Connector/J.
Adding the jars to TomEE/Tomcat
Now that you’ve downloaded the required jars, all you need to do is move them to <Tomcat-Install>/lib folder and you’re done!
TomEE libraries
This step is only required if you are using the drop-in war approach, but it is not mentioned in the offical TomEE/Eclipse docs (which you can find at TomEE and Eclipse).
When TomEE is installed as a drop-in war, it stores its libraries at <Tomcat-Install>/webapps/tomee/lib. This is cool because, if you don’t like TomEE, you can fully uninstall it by simply undeploying the TomEE webapp (more information can be found here: About the ‘tomee’ webapp).
This makes using the drop-in war excellent for experimenting with TomEE. However, it does add an extra step if we want to develop with Eclipse. Eclipse needs to be told about these additional libraries — we will inform Eclipse of these libraries by packaging them in an Eclipse user library and then adding this library to our project build path.
- Window > Preferences
- In the lefthand tree we navigate to Java > Build Path > User Libraries and click New.
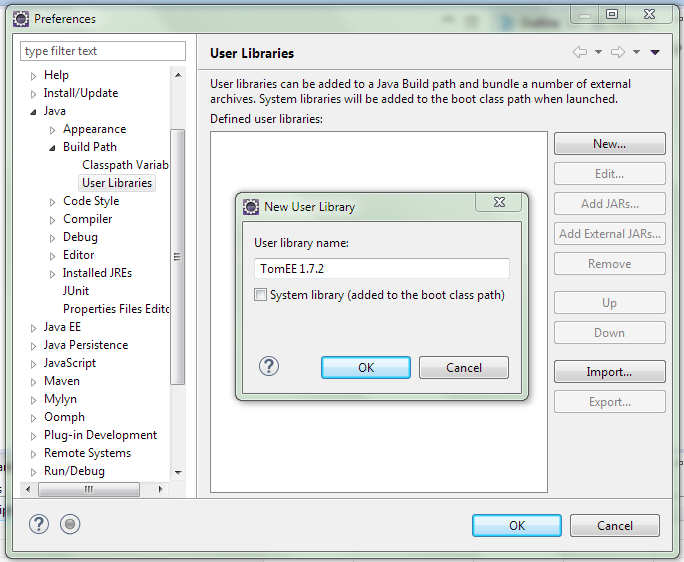
- Name your library “TomEE 1.7.2” (or anything else descriptive) and click OK.
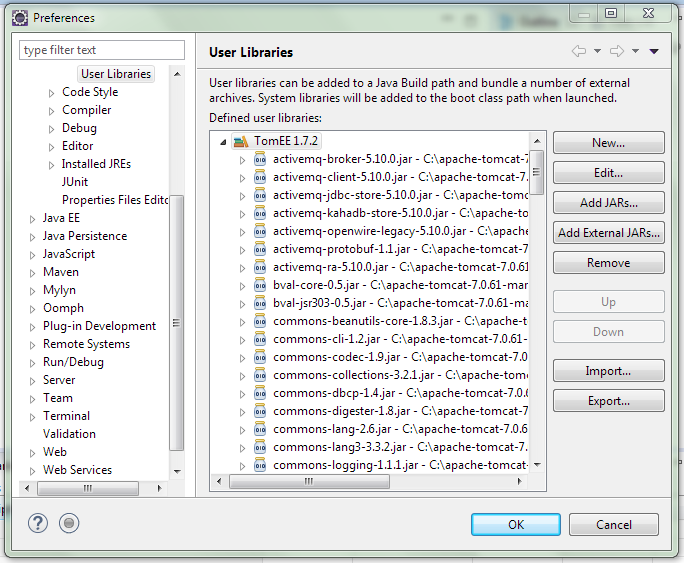
- Click on “TomEE 1.7.2” in the list and then click Add External Jars.
- Navigate to
<Tomcat-Install>/webapps/tomee/liband be sure to select every jar in that folder.
Done. We now have a user library for TomEE’s libraries. The next step is to create our project.
Creating the project
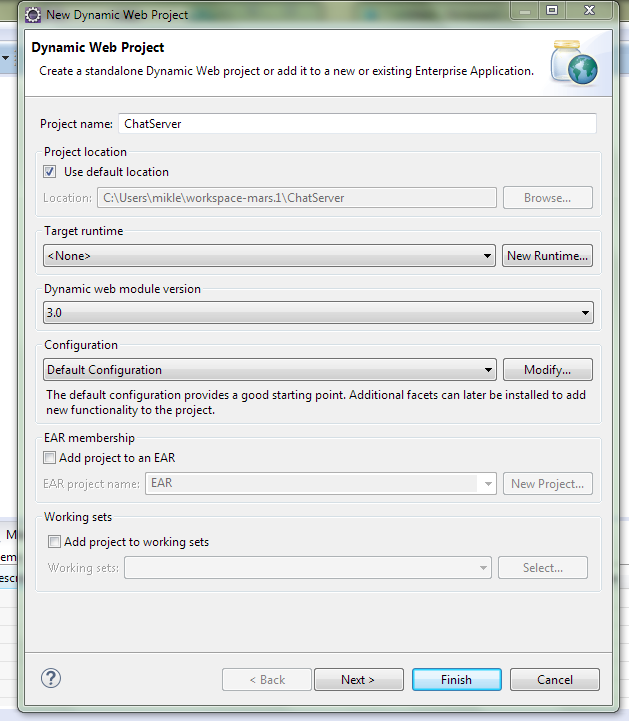
- File > New > Dynamic Web Project

- Name your app ChatServer
New runtime
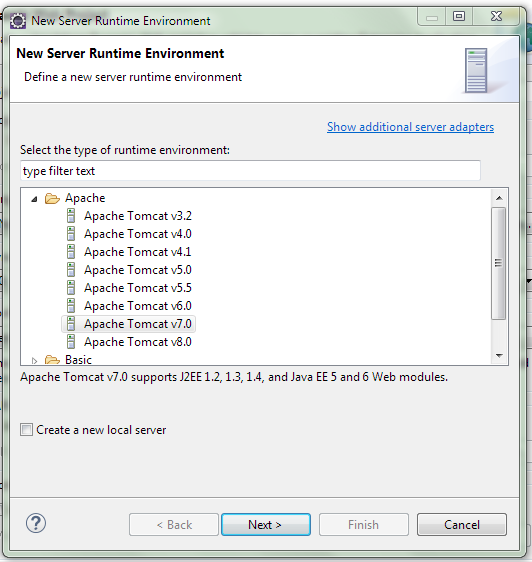
- Click New Runtime.
- Select Apache Tomcat v7.0 and click Next.
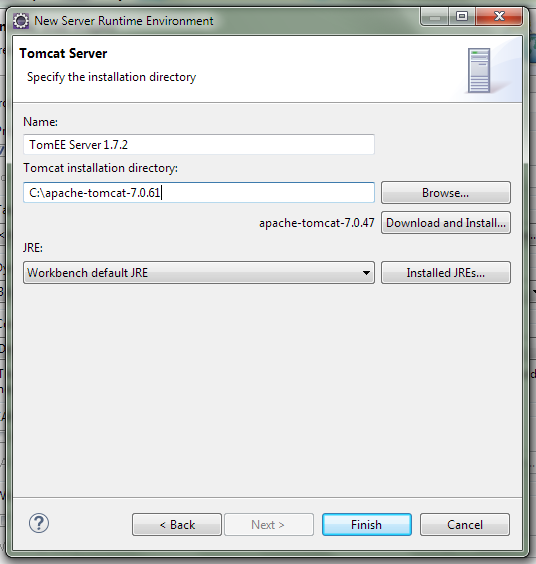
- Select browse and navigate to your Tomcat/TomEE install directory. Click Finish. You will now be at the screen from step 2.
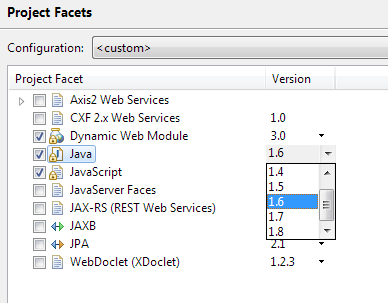
JDK
- Click Modify and ensure your JDK version is set to either JDK 1.6 or 1.7 (as TomEE is not fully optimized for Java 8 yet). Click OK, and then click Finish.
- Click Next to move to the next screen in the wizard.
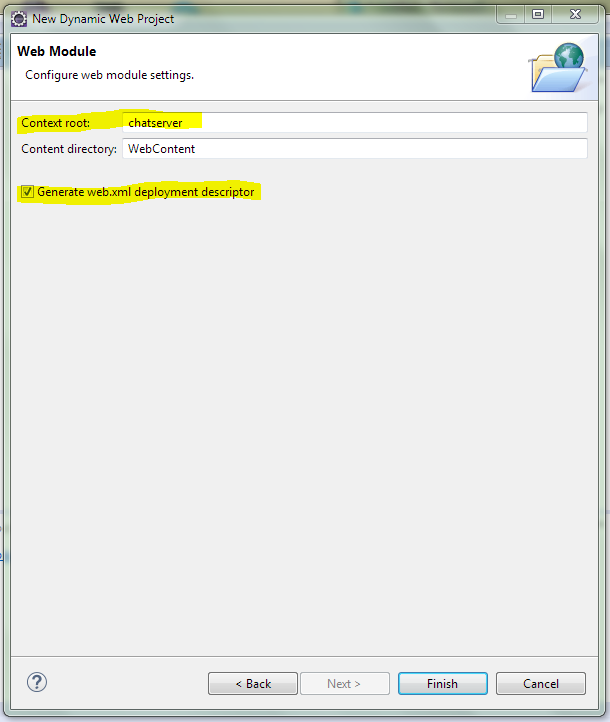
- Change the context root from ChatServer to chatserver and check off the Generate web.xml deployment descriptor checkbox and finish saving the new project.
Now we need to include the TomEE user library we created earlier (this is only necessary if you used the drop-in war approach).
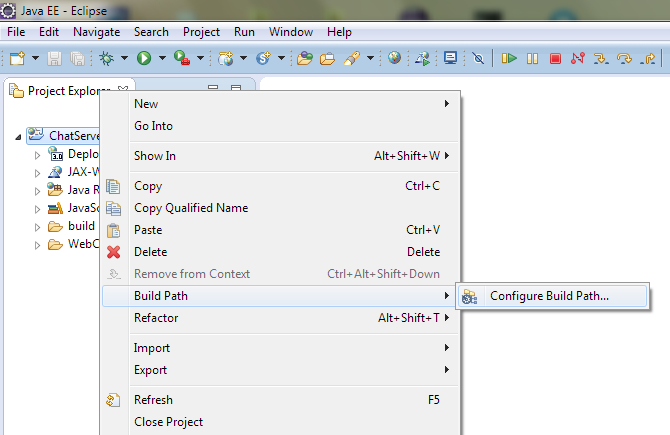
- Right-click your project and select Build Path > Configure Build Path.
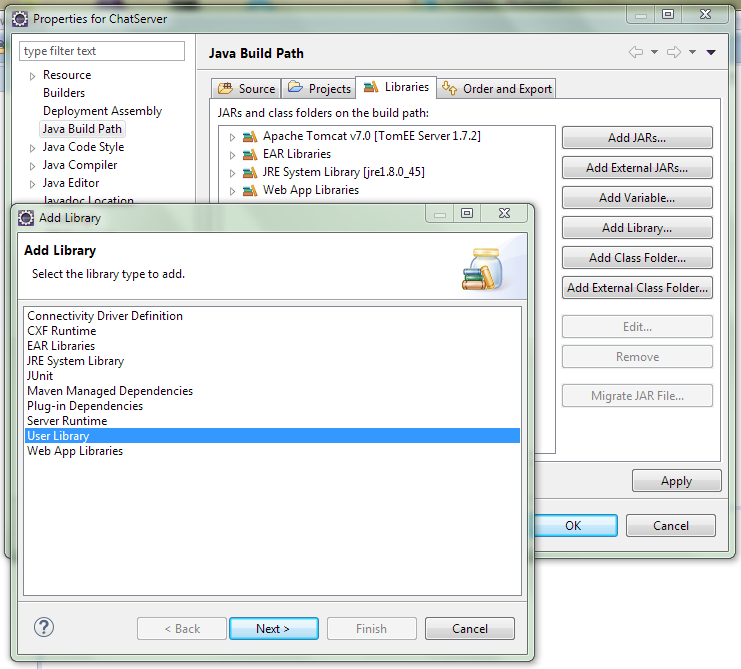
- Click the Libraries tab and then click Add Library.
- Select User Library and click Next.
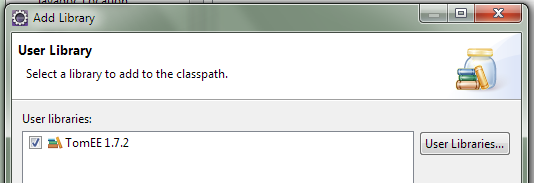
- Check the TomEE 1.7.2 library we created earlier and click Finish.
- Click Apply and OK.
Tell TomEE to use Jackson
As mentioned above, by default TomEE uses an unsuitable JSON object mapper–this is why we added the Jackson jars. Now its time to tell TomEE to use Jackson instead of the default mapper. To do this, simply create a file called openejb-jar.xml in the WebContent/WEB-INF folder of your project, and then paste the configuration text below into openejb-jar.xml and save it.
<?xml version="1.0"?>
<openejb-jar xmlns="http://www.openejb.org/openejb-jar/1.1">
    <pojo-deployment class-name="jaxrs-application">
        <properties>
            cxf.jaxrs.providers = com.fasterxml.jackson.jaxrs.json.JacksonJaxbJsonProvider
        </properties>
    </pojo-deployment>
</openejb-jar>
Sanity Check 1
Before we go any further, we ensure that the project is actually working. So let’s make sure it builds the following simple test.
package chatserver.services;

import javax.ws.rs.Path;
import javax.ws.rs.GET;
import javax.ws.rs.Produces;
import javax.ws.rs.core.MediaType;

@Path("/test")
public class Test
{
    @GET @Path("/")
    @Produces(MediaType.TEXT_PLAIN)
    public String getTestMessage()
    {
        return "Hello TomEE and JEE!";
    }
}
If this builds without errors, we can move on. If not, make sure you followed the steps above correctly, in the correct order, and didn’t miss any steps. We will come back to this test after we configure the server.
Configuring the server for TomEE
Add the server
First we need to add our TomEE server to eclipse.
- In the Servers tab (should be near the bottom of your eclipse screen), right-click (you can right-click on any empty space) and select New > Server.
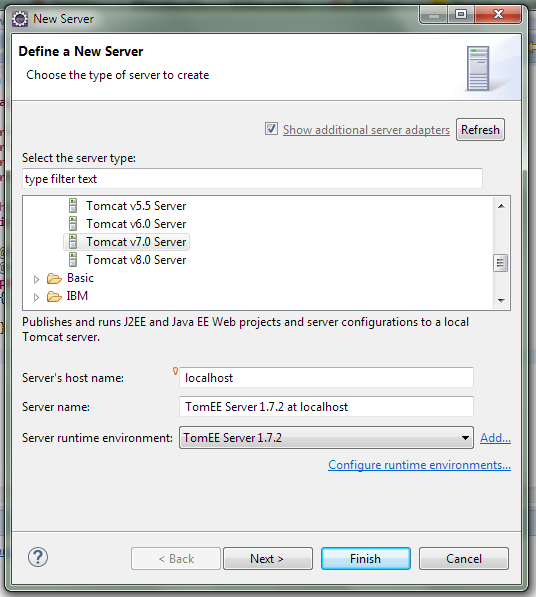
- Select Tomcat v7.0 Server from the list.
- In the Server Runtime Environment dropdrown, select TomEE Server 1.7.2 (it may already be automatically selected), and click Next.
- Select ChatServer from the left Available list, and click Add. It should now appear on the right Configured list.
- Click Finish.
- You should now see TomEE Server 1.7.2 listed in the Servers tab.

Configure the server to launch your application
Now that you’ve added your server, you need to configure it so that it will properly deploy your application. The following steps are taken almost verbatim from the TomEE website (because… lazy) :
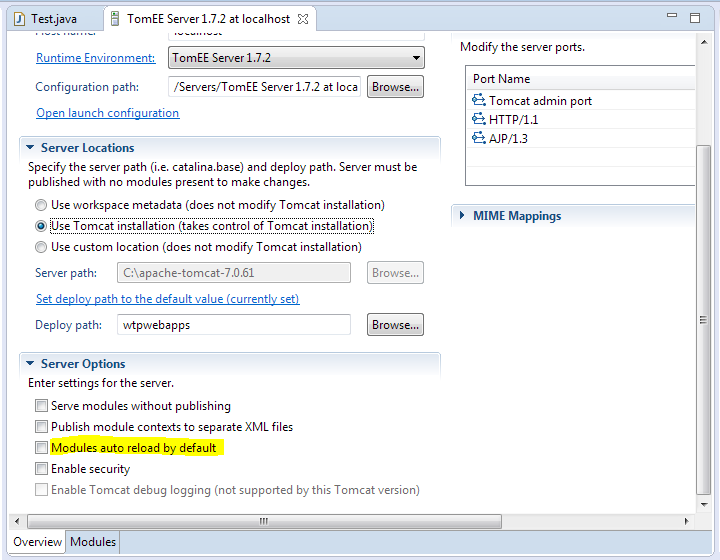
- In the Servers tab, double click on your server to open up the Overview page. Click on the Modules
tab - Click Add External Web Module. In the Add Web Module dialog, for document base, browse to
<TomEE>/webapps/tomee. Set Path: to/tomee. Uncheck Auto reloading enabled. Click OK.

- Return to the Overview tab for the server.
- Deselect the Modules auto reload by default checkbox.
- Click the Save button in Eclipse so the server configuration gets saved.
- Click on your webapp project, then select Project > Clean. Hit OK. This will cause Eclipse to clean and rebuild
- In the Servers tab, right click on the server and select Publish.
Run your application
- When you’re ready to deploy your project, right-click your project and select Run As > Run On Server
- Make sure that the TomEE Server 1.7.2 environment is selected in the Server runtime environment
- On the Run on Server dialog, click the Always use this server when running this project checkbox
- Click Finish – Eclipse will start TomEE and deploy your project
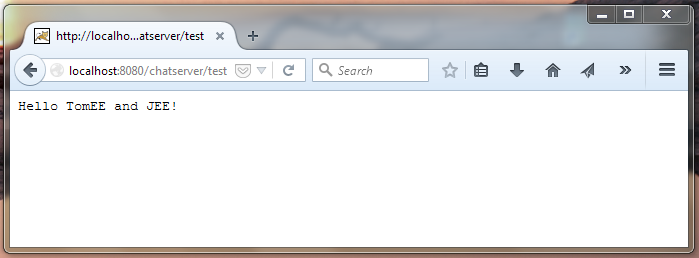
Sanity Check 2
To ensure that we’ve done everything correctly up to this point, we’re going to try and run the test we developed in Sanity Check 1. To do this, take your browser to localhost:8080//chatserver/test. You should see the following page :
Adding the database
Our final step is to configure the database. We assume that you have a MySQL or other database created for the project already. Below, we will explain how to configure TomEE so it can access it.
To make TomEE aware of your database, stop the server and edit <Tomcat-Install>/conf/tomee.xml to include the following entry (and of course, be sure to nest this entry at the same level as the other Resource entries in tomee.xml) :
<Resource id = "myDatasourceName" type="DataSource">

    JtaManaged true
    DataSourceCreator tomcat

    validationQuery SELECT 1
    testOnBorrow true
    validationInterval 30000
    maxActive = 200
    maxIdle = 200

    JdbcDriver <your jdbc driver class>
    JdbcUrl <your jdbc driver url to your database>
    UserName myusername
    Password mypass

</Resource>
The settings in blue are optional, but I have found them to work well for testing (these are standard Tomcat database connection pool options, a full listing of which can be found in the Common Settings section of The Tomcat JDBC Connection Pool docs). Below is an example of an entry for a local MySQL database named chatserver :
<Resource id = "datasource_chatserver" type="DataSource">

    JtaManaged true
    DataSourceCreator tomcat

    validationQuery SELECT 1
    testOnBorrow true
    validationInterval 30000
    maxActive = 200
    maxIdle = 200

    JdbcDriver com.mysql.jdbc.Driver
    JdbcUrl jdbc:mysql://localhost:3306/chatserver
    UserName myusername
    Password mypassword

</Resource>
Restart the server, and you’re done! Now it’s time to write your first TomEE/JEE REST server!
Where to go from here?
To continue learning about developing your own REST server, check out the other tutorials in this series :
The simplification of Java Enterprise Edition
Defining JPA 2.0 relationships